Once the scan is completed, it may take a few seconds to store and texture the model. In case you wish to turn off texturing, you can do so on the home-screen and select Menu→Settings and turn off Automatically texture scan. Once completed, you’ll be able to see the 3D model of your scan.

From here you will be able to add multiple scans to the floor (see next section) or finalise the floor with additional annotations. When pressing the edit button on the bottom left a number of sub-menu’s will appear for adding additional annotations. You’ll find the dedicated chapter for more information about these here:
Normally weScan tries to automatically relocate itself when adding a new scan to an existing floor when pointing the camera to a previously see area (a picture will be showed on the screen). However, in case weScan is unable to do so it will ask to start a manual scan, meaning that you will have to manually align the scan. After finishing a manual scan weScan will open the Manual alignment tool and will automatically select your latest scan. Otherwise, you can open the manual alignment tool by pressing the edit-button on the bottom left and select the puzzle icon on the top.

To align the selected scan with the other scans use the following gestures to drag them to the correct location.
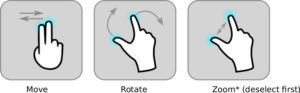
Or for zooming the camera, temporally deselect the scan you are aligning, then you can zoom the camera to the desired distance and re-select the scan again to continue aligni
To improve the quality of the model, we recommend adding a few laser measurements. These measurements will be used to calibrate the 3D model accordingly. To open the laser notes pag, select the Bosch-laser icon from the edit-menu.
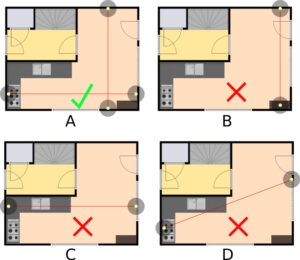
Wall-to-wall: For the best results weScan requires at least 2 wall-to-wall measurements to be added per floor for calibrating the model. In addition to having 2 extra measurements for challenging rooms such as a bathroom or balcony. In general it is best to simple take the length and the width of a floor if possible, or otherwise the largest 2 distances on that floor. We emphasis on the point that these measures should be between 2 opposing walls, and should not be taken from a window, door or cupboard. To add such a measurement. tab the icon as shown shown on the left and drag a line between 2 walls on the 3D model. Proceed with adding the measurement that you measured using a laser measuring device. Best practice for adding wall-to-wall laser measurements as shown in the figure below
- A: Correct laser measurements added from wall to wall for the length and width of the house.
- B: Incorrect laser measurement, avoid measuring from wall to closet.
- C: Incorrect laser measurement, avoid measuring from wall to window, only add laser measurements from wall to wall.
- D: Incorrect laser measurement, make sure the laser measurement is straight (perpendicular to the wall it starts from)
1.5m line: For the NEN2580 standard, areas below the 1.5m line may not be considered as living area. Therefore, for the NEN2580 report, we require the 1.5m line to be annotated for areas where it appears. To annotate this, press on the icon on the left and drag between the position where you believe the 1.5m line is located. It is possible to use a stick of exactly 1.5m to find the intersection of the wall and the 1.5m line. For example, the picture below represents a side-view of a roof-top. The gray areas are considered below this 1.5m line and may not be considered for living areas.
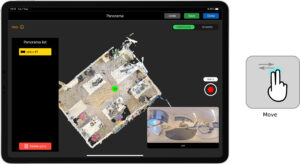
For generating a virtual tour, it is required to take panoramas. Our scanner works with the Insta-360 ONE X/X2 camera. and Ricoh Theta. For the first time, the 360-camera requires to be configured, to do so install the Insta-360 or Ricoh Theta app for IOS . After opening the Insta-360 app and connecting to the panorama camera, it is configured. You can now directly connect to the panorama camera by connecting to it in the WiFi settings. Follow the following steps to start capturing panorama’s:
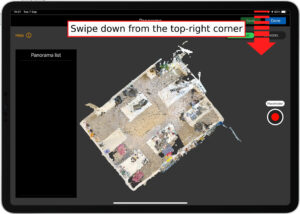
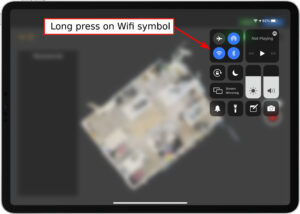
- Swipe down in the top-right to open the Control center menu
- Long press the WiFi symbol
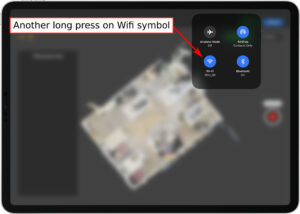
- Long press the WiFi symbol in the menu again
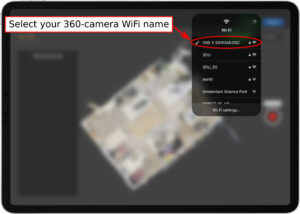
- Select your 360 camera (e.g. ONE X)
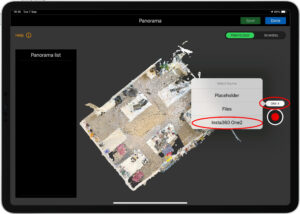
- Go back to weScan and after a few seconds the 360-camera should appear above the red capture-button on the right. If it does not automatically switch to the 360-camera, you can manually select if from the menu.
When capturing panorama’s, there are a few things to consider:
- Create a panorama for every room and hallway;
- Make sure no person (including yourself) are not captured in the panorama;
- For the virtual tour, it is best to create panorama’s in a natural walking path e.g. that for every panorama you take there is at least 1 other panorama location that can be seen from that location. This is to prevent panorama’s being behind walls in the virtual tour.